Arbor Day and Tree Activities

Friday, April 28, is National Arbor Day in the US. It’s a perfect time to read A Tree is Nice by Janice May Udry, and spend some time studying trees!

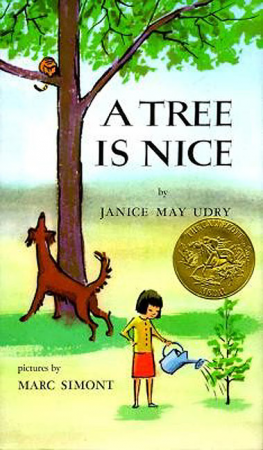
A Tree is Nice is a lovely book that won the Caldecott Medal in 1957, with illustrations alternate between color and black-and-white. The text describes the many ways that trees are a part of our lives. It even ends with planting a tree, which would be perfect if you plan to plant a tree with your class or at home!

You can easily use this book as a way to explore nature and scientific concepts of plant life, conservation and environmentalism.

Best Ages: pre-k – 2nd grade

For Parents:

  • Take a walk with your child. Make observations about the trees that are becoming more green and full in the spring season. Collect leaves from the ground.
  • At home, place a blank white paper over the leaves you collected on your walk and gently rub a crayon over the paper. You will create a raised image of the leaf. Talk about the difference in the shapes of the leaves and display your final artwork!

For Teachers:

  • Teach your students the parts of a tree. Use a free handout like this one if desired.
  • Explain the differences between coniferous and deciduous trees with this free slide show from Teachers Pay Teachers.
  • Discuss how trees are used to make products that we use. Here is a wonderful, free lesson plan from Penn State’s College of Agricultural Sciences.

Finding a Book for Disinterested Early Readers

Do you have a child or a student who struggles to find something interesting to read? Try non-fiction!

It may sound counter-intuitive to adults out there who love fiction, but in my experience as a teacher, I noticed that many young readers love non-fiction. Find a topic that interests your child/student, and check the library for some great reading material for you to read aloud or for your child to practice reading independently. This can be an especially powerful motivating tool for boys who don’t always like what their female teachers or moms like to read. 🙂

Looking for a book to start off with? Try Michelle Wie by Mary Dunn. This book is a biography of a Korean-American female golfer, which may interest students who like sports. Michelle Wie is a dedicated athlete who has made records for her achievements in golf at astonishingly young ages.

This book works great as a read-aloud and can be showcased as an example of non-fiction and a biography. It includes a table of contents, page numbers, headings, a timeline, glossary and index. Early readers can use this book to practice, too.

Another benefit of the book is that it is a part of series on athlete biographies for children, so you can keep going in the series if your child/student likes this one!

Best Ages: kindergarten – 2nd grade

Get Your Kids Interested in Science with Tractors

Sometimes a good book can get your child or students hooked onto a new concept. When I taught full-time, I enjoyed using literature to kick off different units and generate more interest in a particular study topic.

The book I’m posting on today has two attractive features. First, it’s a children’s book written and illustrated by a man!  (Have you noticed that women tend to dominate this arena?) Second, it is a book with unique illustrations. As a final bonus, I couldn’t help but notice the sweet dedication to his college art professor – an inspiration to all of us educators out there! 🙂

Big Tractor by Nathan Clement has computer graphic illustrations that further convey the enormity of the modern tractor machine. Simple text provides great information about the many types of work a large modern tractor completes in various seasons. This book would be a good read-aloud to introduce unit on agriculture, large machines or plant life. Check out some of my ideas below to explore with your child or students!

Best Ages: pre-k – 1st grade

For Parents:

  • Make a tractor craft out of painted popsicle sticks or this super cute keepsake that uses your child’s footprint as part of the tractor.
  • Purchase grass seeds and plant them in a plastic cup with potting soil. Water and place next to a window. Allow your child to make observations about how long it takes to grow. You can even try cutting the grass when it gets long enough!

For Teachers:

  • Play the “Farmer in the Dell” game with your students in the gymnasium or outside. If you’d like to teach your students the song or play it in the background, here is one of many versions of the song on YouTube, featuring a farmer on a tractor.
  • Plan a field trip to a farm or a local children’s museum with a farming exhibit. (We have visited two locations in the midwest that have fun, hands-on exhibits relating to agriculture!)
  • To further explore how crops grow, take a day of science to implement this free lesson from Scholastic titled “From Plant to Seed.”

Reading Fun that Makes Children Laugh!

Kids love to giggle, and they love to be silly! So why not harness that and get in some reading time, too?

Riddle Rhymes by D.J. Panec is a fun book that encourages interactive reading with parent and child. The parent reads the riddle, which shows a photograph clue, and the child answers with a word that rhymes. When you turn the page together, you can find out if your child solved the riddle correctly!

My kids were instantly hooked on this book and after reading it several times together, they were practicing it on their own. Very sweet!

This can also be used in a classroom setting for a cooperative read-aloud or practice for an emergent reader. Or if you have a reluctant reader in the home or the classroom, this might be a book to catch his/her interest!

Best Ages: pre-k – kindergarten (read aloud), 1st-2nd grade (independently read)

Quilting & Math, Literature and Social Studies

I can barely sew a button back on when it falls off my husband’s shirt, but many of the women in my family are experts with a needle and thread. My grandmother quilts and has gifted us beautiful quilts we will always treasure. We also have an heirloom quilt that was pieced together by the quilting bee at my aunt’s parish when a trunk of hand-stitched quilting blocks was discovered in a relative’s attic. These blocks were determined to be sewn by my great-grandmother before the Great Depression.

eliyahquilt
The heirloom quilt that was pieced together decades after my great-grandmother first stitched the blocks.

The precious quilts made by my family made this particular book jump out at me when I saw it displayed at our public library a few weeks ago!

The Quilting Bee by Gail Gibbons tells the history and modern-day process of quilting in a fun, engaging way. The illustrations are bright and include many styles and types of quilting. Best of all, this book can easily fit into many content areas for the elementary classroom:

  1.  A literature unit on pioneers for books such as Sarah, Plain and Tall, Little House on the Prairie or Addie Across the Prairie.
  2. A social studies lesson on the Oregon Trail, as many of the quilting patterns and blocks were created and used by settlers who traveled west in the United States during the 19th century.
  3. A math lesson relating to topics of symmetry, geometry and shape recognition or tessellations.

And The Quilting Bee can also be incorporated in early childhood or preschool classes to touch on the topics of history, colors or teamwork.

Best Ages: pre-k – 3rd grade

For Parents:

  • If you have any family quilts, take them out and show them to your children. Or talk about their favorite blankets and how comforting it can be to have a special covering for going to sleep.
  • Visit a county fair or stop by a local craft/sewing store with your child. Show them the materials people use to sew today, as seen in the book.

For Teachers:

  • For older students, use this free lesson to have students will measure and fit together quilt pieces to make their own creations. Or check out this teacher’s idea for creating tissue paper quilt blocks.
  • For younger students, hand out this free printable of addition/subtraction practice that forms a quilting block. Students then color in the quilt block according to the key.


Dog Safety for Kids

My daughters, like many children, absolutely LOVE dogs. Although we don’t own a dog, we have many friends and family members who do, and our girls always look forward to playing with and petting the dogs when we visit those homes. But my kids’ natural curiosity and enthusiasm about dogs doesn’t translate to an innate understanding of how to respect and interact with dogs safely. (Ever seen a kid yank on a dog’s tail, try to ride a dog, get in a dog’s face when they are sleeping or eating? Yep, my kids have tried to do all that and more!)

eliyah_molly
My oldest daughter and I pose for a photo with my cousin’s lovable Saint Bernard, Molly (March 2014).

So how do we encourage our kids to enjoy these wonderful pets while staying safe?

Teaching some basic precautions can go a long way. And if you’re not sure where to start, or you think your children or students could use a refresher, I highly recommend the book May I Pet Your Dog? by Stephanie Calmenson. This book teaches dog safety in a way that is easy for children to understand without stirring up an unhealthy fear of dogs.

What makes the book extra fun is that it’s told from the perspective of a dog talking to a little boy. My daughters really enjoyed reading this book and I appreciated the clear presentation of dog safety guidelines. Some of those guidelines include:

  • Do not interact with an unknown dog if his/her owner is not there.
  • Always ask to pet someone’s dog before touching them or getting too close.
  • Be considerate of dogs who are sleeping, eating, caring for puppies or chewing on a bone, toy or stick.
  • Be gentle and be kind – remember that dogs have feelings, too!

(Taken from pages 30-31 in May I Pet Your Dog?)

Do you have suggestions for helping kids learn how to interact safely with dogs? Please leave a comment!


Best Ages: pre-k – 2nd grade


Spring Crafts for Kids

My children love to paint and color! We have art time at our house nearly every day. With a two-year old and a four-year old, I try to keep our crafts simple and use supplies that are inexpensive and easy to clean up. I’m sharing them here because sometimes it can be hard to think of something simple to do when you have extra time at home or in the classroom.

And if you’d like a book to go along with any of these spring crafts, check out my post on a  fun springtime read. 🙂

These are 4 spring crafts we have done in our house over the last couple of weeks:

#1 Paper Plate Umbrellas

  • Cut a paper plate in half, then create scalloped edges.
  • Use construction paper to make a “J” shape and tape for the umbrella handle.
  • Allow child to decorate. (We used small pieces of tissue paper and practiced glue skills.)

umbrellas.JPG

#2 Silly Bunnies

  • Cut out a bunny shape from a piece of construction paper. Next, make a set of paws and feet. Allow child to paint or color the bunny.
  • Make 4 thin strips of construction paper, approximately 3-4 inches long and 1/2 inch wide. Fold each strip fold accordion-style.
  • Tape or glue the paws and feet to the strips and then to the bunny.
  • Add “extras” to decorate the bunny or simply draw in a face using marker. My children used googley eyes, pom poms and we even stuck a cotton ball on the back of the bunny for a tail. 🙂

sillybunnies.JPG

#3 Tin Foil Painting

  • Cut a large rectangle from the back of an old cereal box. Cover with tin foil.
  • Use acrylic paints to create a scene or “abstract” spring painting – give your children/students green, yellow, pink, blue and/or purple as cheerful spring colors.
  • If desired, tape yarn or string to the back to hang and display.

tinfoilpainting.JPG

Note: I remember doing this as a child and I loved it! The ones my kids painted turned out so nicely although the picture quality doesn’t reflect it too well. My apologies!

#4 Easter Cross with Sponge Painting

  • Cut out cross using brown construction paper and heart using pink or red construction paper. Glue Heart to the center of the cross.
  • If desired, write a phrase or Bible verse inside the heart using Sharpie. Some examples are Jesus is Risen, Happy Easter, Jesus Loves Me.
  • Cut up a sponge and demonstrate how to dip the sponge in the paint and then dab it on the paper to create a textured look.  They may not end up doing it (one of my kids did and one didn’t) but even using a slightly different medium for painting can be a fun experience!

crossartsupplies.JPG